Building a Webex Chatbot for Testbed Environment Monitoring 🤖
🚀 Build an Intelligent Testbed Monitoring Bot
Automate testbed management with WebSocket-powered real-time monitoring
📋 Table of Contents
Overview
The Testbed Monitor Bot is a sophisticated Webex-integrated chatbot that revolutionizes how teams manage and track test environment resources. Built with Python and leveraging WebSocket technology, it eliminates the need for webhooks and public IP addresses.
Real-time Monitoring
Track testbed availability and usage with instant updates
Smart Broadcasting
Notify teams across multiple Webex rooms automatically
Easy Registration
Book testbeds with interactive Adaptive Cards UI
WebSocket Security
No public IP needed - secure behind firewalls
🎯 Key Features
🔌Why WebSocket?
Unlike traditional webhook-based bots that require:
- ✗ Public IP address
- ✗ SSL certificates
- ✗ Firewall configurations
- ✗ ngrok tunnels
This bot uses WebSocket connections:
- ✓ Works behind corporate firewalls
- ✓ No complex network setup
- ✓ Real-time bidirectional communication
- ✓ Automatic reconnection on failure
Core Capabilities
- 📊 Monitoring
- ✍️ Registration
- 📢 Broadcasting
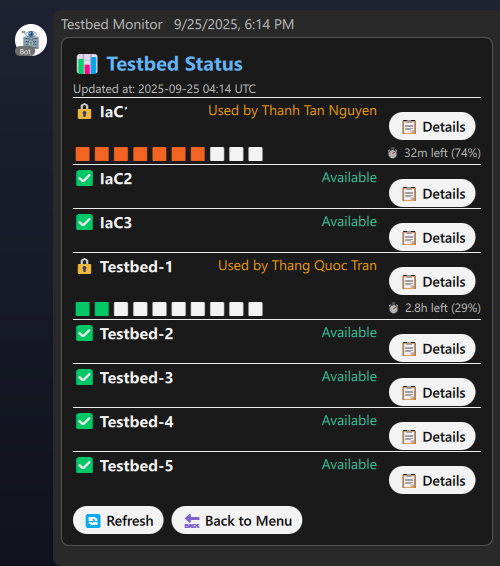
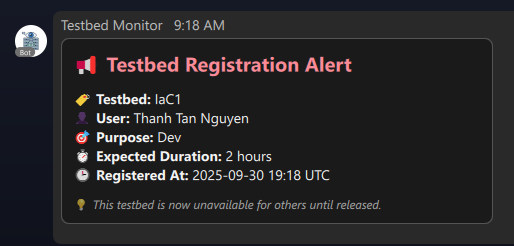
Real-time Testbed Status
- View all testbeds at a glance
- See who's using what resource
- Track usage duration and expected release time
- Color-coded availability indicators
# Bot automatically tracks:
{
  "testbed_name": "Testbed-1",
  "status": "in_use",
  "user_email": "engineer@company.com",
  "registered_time": "2025-10-01T10:30:00Z",
  "expected_release_time": "2025-10-01T18:00:00Z"
}
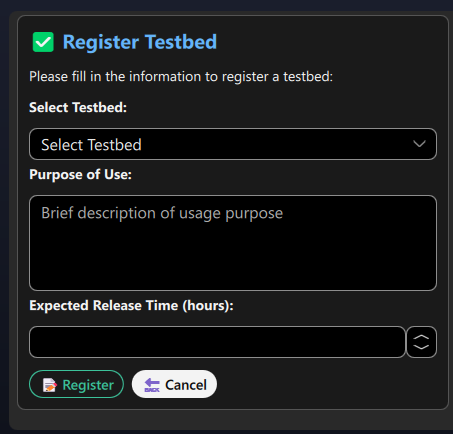
Interactive Registration System
- Adaptive Cards UI - No typing required
- Auto-populated user info - Pulls from Webex profile
- Dropdown selection - Choose from available testbeds
- Time tracking - Set expected release time
- Purpose logging - Document usage reason
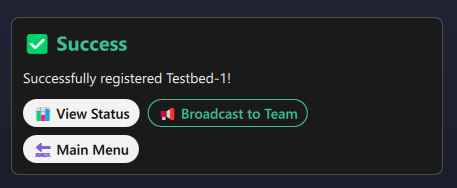
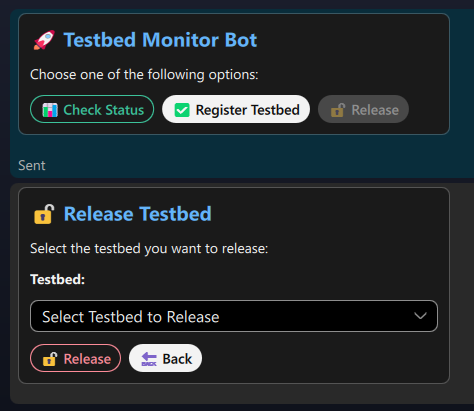
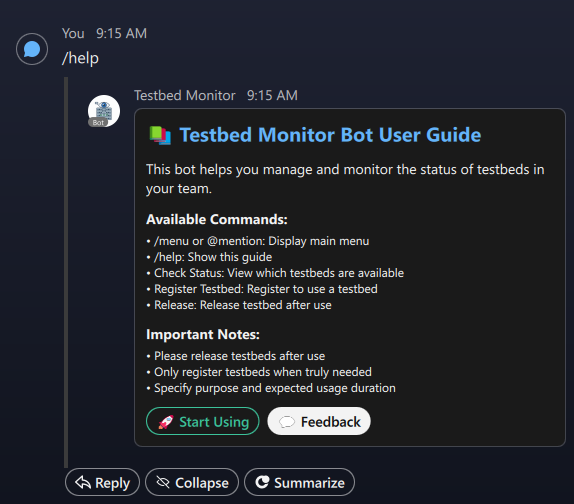
Example workflow:
- User sends
testbedcommand - Bot displays menu card
- User clicks "Register Testbed"
- Bot shows registration form
- User fills form and submits
- Bot updates database and confirms
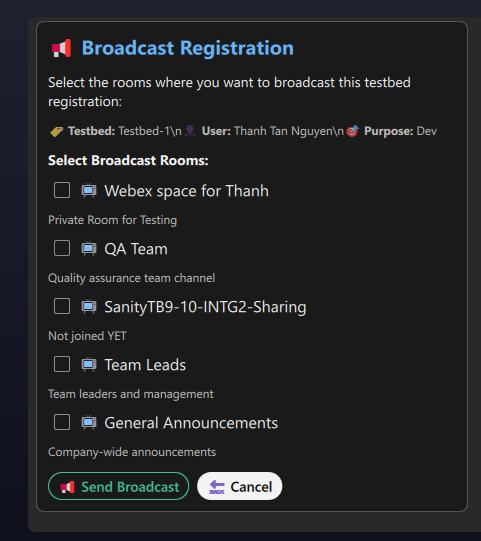
Multi-room Notifications
Broadcast testbed status to multiple Webex rooms:
{
  "broadcast_rooms": [
    {
      "name": "QA Team",
      "room_id": "Y2lzY29zcGFyazovL...",
      "description": "Quality assurance team channel"
    },
    {
      "name": "Development Team",
      "room_id": "Y2lzY29zcGFyazovL...",
      "description": "Dev team coordination"
    }
  ]
}
Features:
- Select specific rooms for broadcasting
- Rich card notifications with full details
- Automatic room discovery
- Permission-based access
🏗️ System Architecture
🏗️ Interactive System Architecture
Technology Stack
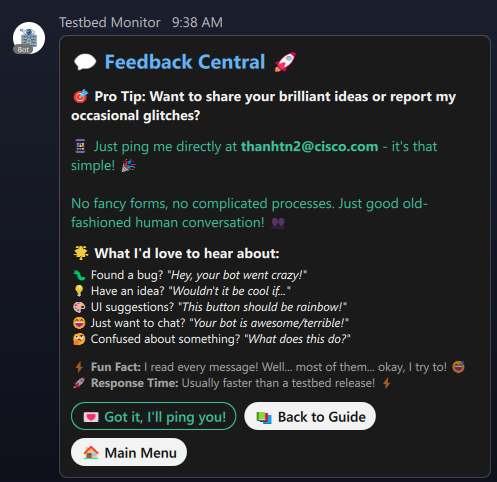
📸 Bot Interface Gallery
🚀 Getting Started
Prerequisites
✅Requirements Checklist
Before starting, ensure you have:
- Python 3.10+ installed and configured
- Webex Teams account with bot creation privileges
- Network access to Webex APIs (or proxy configuration)
- Basic knowledge of Python and REST APIs
Optional but recommended:
- Git for version control
- Virtual environment (venv/conda)
- Docker for containerized deployment
Step 1: Create Your Webex Bot
- 🌐 Web Portal
- 🔧 API Method
Register via Webex Developer Portal:
-
Visit developer.webex.com
-
Sign in with your Webex credentials
-
Navigate to My Apps → Create a New App
-
Select Create a Bot
-
Fill in bot details:
Bot Name: Testbed Monitor Bot
Bot Username: testbed-monitor@webex.bot
Bot Icon: [Upload custom icon]
Description: Intelligent bot for tracking and managing testbed usage
- Click Add Bot and copy the Bot Access Token
⚠️🔒 Security Warning
Never commit your bot token to version control!
The bot access token is like a password. If exposed:
- Anyone can impersonate your bot
- Unauthorized access to conversations
- Potential data breaches
Always store it in:
- Environment variables
.envfiles (add to.gitignore)- Secret management systems (AWS Secrets Manager, Azure Key Vault)
Create Bot via REST API:
curl -X POST https://webexapis.com/v1/bots \
  -H "Authorization: Bearer YOUR_PERSONAL_ACCESS_TOKEN" \
  -H "Content-Type: application/json" \
  -d '{
    "name": "Testbed Monitor Bot",
    "username": "testbed-monitor",
    "avatar": "https://your-domain.com/bot-icon.png"
  }'
Response:
{
  "id": "Y2lzY29zcGFyazovL...",
  "name": "Testbed Monitor Bot",
  "created": "2025-10-01T10:00:00.000Z",
  "email": "testbed-monitor@webex.bot",
  "token": "YOUR_BOT_ACCESS_TOKEN"
}
Step 2: Environment Setup
- 🪟 Windows
- 🍎 macOS/Linux
- 🐳 Docker
Windows Setup:
# Clone the repository
git clone https://github.com/ngtanthanh-qc/webexchatbot_sample.git
cd webexchatbot_sample

# Create virtual environment
python -m venv .venv

# Activate virtual environment
.venv\Scripts\activate

# Install dependencies
pip install -r requirements.txt
macOS/Linux Setup:
# Clone the repository
git clone https://github.com/ngtanthanh-qc/webexchatbot_sample.git
cd webexchatbot_sample

# Create virtual environment
python3 -m venv .venv

# Activate virtual environment
source .venv/bin/activate

# Install dependencies
pip install -r requirements.txt
Docker Setup:
FROM python:3.11-slim

WORKDIR /app

# Copy requirements and install
COPY requirements.txt .
RUN pip install --no-cache-dir -r requirements.txt

# Copy application
COPY . .

# Run bot
CMD ["python", "example.py"]
Build and run:
docker build -t testbed-bot .
docker run -d --env-file .env --name testbed-bot testbed-bot
Step 3: Configuration�
Create .env file in project root:
# Webex Bot Configuration
WEBEX_ACCESS_TOKEN=your_bot_access_token_here
BOT_NAME=Testbed Monitor Bot

# Database Configuration
TESTBED_DB_NAME=testbed_monitor.json

# Webex API Configuration
WEBEX_API_URL=https://webexapis.com/v1

# Approved Rooms (comma-separated room IDs)
# Find room ID: Open Webex web, go to room, copy ID from URL
APPROVED_ROOMS=Y2lzY29zcGFyazovL3VzL1JPT00vNTU4NGI4MjAtNTRkMi0xMWVkLTg0YWItYzMyYWU2ZGNhOGE4

# Proxy Configuration (if behind corporate firewall)
HTTPS_PROXY=http://proxy.company.com:80
WSS_PROXY=socks5://proxy.company.com:1080
🆔🔍 Finding Room IDs
How to get Webex Room ID:
- Open Webex Web App
- Navigate to the desired room/space
- Look at the browser URL:
https://web.webex.com/spaces/Y2lzY29zcGFyazovL3VzL1JPT00v...^^^^^^^^^^^^^^^^^^^^^^^^^^^^^^^^This is your Room ID
- Copy the ID after
/spaces/
Alternative method via API:
from webexpythonsdk import WebexAPI

api = WebexAPI(access_token='YOUR_TOKEN')
rooms = api.rooms.list()

for room in rooms:
    print(f"{room.title}: {room.id}")
Step 4: Database Initialization
The bot uses JSON for lightweight data storage. Customize testbed_monitor.json:
{
"testbeds": [
  {
    "id": 1,
    "testbed_name": "Production-Mirror",
    "status": "available",
    "user_email": null,
    "user_name": null,
    "registered_time": null,
    "purpose": null,
    "expected_release_time": null
  },
  {
    "id": 2,
    "testbed_name": "Dev-Environment-1",
    "status": "available",
    "user_email": null,
    "user_name": null,
    "registered_time": null,
    "purpose": null,
    "expected_release_time": null
  },
  {
    "id": 3,
    "testbed_name": "IaC-Sandbox",
    "status": "in_use",
    "user_email": "engineer@company.com",
    "user_name": "John Doe",
    "registered_time": "2025-10-01T09:00:00Z",
    "purpose": "Testing CI/CD pipeline",
    "expected_release_time": "2025-10-01T17:00:00Z"
  }
]
}
Database Schema:
| Field | Type | Description |
|---|---|---|
id | Integer | Unique testbed identifier |
testbed_name | String | Testbed display name |
status | String | available or in_use |
user_email | String/null | Email of current user |
user_name | String/null | Name of current user |
registered_time | ISO8601/null | When testbed was booked |
purpose | String/null | Usage purpose/description |
expected_release_time | ISO8601/null | Expected availability time |
Step 5: Main Bot Implementation
import os
from webex_bot.commands.testbed_main import TestbedMainCommand
from webex_bot.commands.help_custom import CustomHelpCommand
from webex_bot.webex_bot import WebexBot
from config import Config

# Proxy configuration (optional)
proxies = {
  'https': 'http://proxy.company.com:80',
  'wss': 'socks5://proxy.company.com:1080'
}

# Validate configuration
try:
  Config.validate_config()
except ValueError as e:
  print(f"❌ Configuration error: {e}")
  exit(1)

# Create Bot instance
bot = WebexBot(
  teams_bot_token=os.getenv("WEBEX_ACCESS_TOKEN"),
  approved_rooms=Config.APPROVED_ROOMS,
  bot_name=Config.BOT_NAME,
  include_demo_commands=False,
  help_command=CustomHelpCommand(),
  proxies=proxies
)

# Register custom commands
bot.add_command(TestbedMainCommand())

# Start the bot (blocking call)
if __name__ == "__main__":
  print("🚀 Starting Testbed Monitor Bot...")
  print(f"📝 Bot Name: {Config.BOT_NAME}")
  print(f"🔧 Approved Rooms: {len(Config.APPROVED_ROOMS)}")
  bot.run()
  print("✅ Bot is running! Press Ctrl+C to stop.")
🎨 Bot Features Deep Dive
Interactive Command Demo
Try the bot command simulator below:
💬 Bot Command Simulator
Custom Adaptive Cards
The bot uses Adaptive Cards for rich, interactive UI:
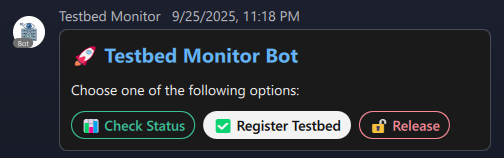
- 🏠 Main Menu
- ✍️ Registration Form
- 📊 Status Display
Main Menu Card Structure:
from webexpythonsdk.models.cards import AdaptiveCard, TextBlock, ActionSet
from webexpythonsdk.models.cards.actions import Submit

def create_main_menu():
    card = AdaptiveCard(
        body=[
            TextBlock(
                "🤖 Testbed Monitor Bot",
                size="Large",
                weight="Bolder",
                color="Accent"
            ),
            TextBlock(
                "Choose an action:",
                wrap=True
            )
        ],
        actions=[
            Submit(title="📊 Check Status", data={"action": "status"}),
            Submit(title="✍️ Register Testbed", data={"action": "register"}),
            Submit(title="🔓 Release Testbed", data={"action": "release"}),
            Submit(title="📢 Broadcast", data={"action": "broadcast"}),
        ]
    )
    return card.to_dict()
Registration Form with Input Validation:
from webexpythonsdk.models.cards import *
from webexpythonsdk.models.cards.inputs import Text, Choices, DateInput

def create_registration_form(available_testbeds):
    # Create testbed choices
    testbed_choices = [
        Choice(title=tb["testbed_name"], value=str(tb["id"]))
        for tb in available_testbeds
    ]

    card = AdaptiveCard(
        body=[
            TextBlock("Register Testbed", size="Large", weight="Bolder"),

            # Testbed selection dropdown
            Input.ChoiceSet(
                id="testbed_id",
                label="Select Testbed",
                choices=testbed_choices,
                style="compact"
            ),

            # Purpose text input
            Text(
                id="purpose",
                label="Purpose",
                placeholder="e.g., Testing new feature",
                maxLength=200,
                isRequired=True
            ),

            # Expected release time
            DateInput(
                id="release_date",
                label="Expected Release Date"
            ),

            Text(
                id="release_time",
                label="Expected Release Time (HH:MM)",
                placeholder="e.g., 18:00"
            )
        ],
        actions=[
            Submit(title="✅ Register", data={"callback": "register_submit"}),
            Submit(title="❌ Cancel", data={"callback": "cancel"})
        ]
    )
    return card.to_dict()
Status Dashboard with Color Coding:
def create_status_card(testbeds):
    containers = []

    for tb in testbeds:
        # Color based on status
        status_color = "Good" if tb["status"] == "available" else "Warning"
        status_text = "✅ Available" if tb["status"] == "available" else "🔴 In Use"

        container = Container(
            items=[
                ColumnSet(
                    columns=[
                        Column(
                            items=[
                                TextBlock(
                                    tb["testbed_name"],
                                    weight="Bolder",
                                    size="Medium"
                                )
                            ],
                            width="auto"
                        ),
                        Column(
                            items=[
                                TextBlock(
                                    status_text,
                                    color=status_color,
                                    horizontalAlignment="Right"
                                )
                            ],
                            width="stretch"
                        )
                    ]
                )
            ],
            style="emphasis" if tb["status"] == "in_use" else "default",
            spacing="Small"
        )

        # Add user info if in use
        if tb["status"] == "in_use":
            container.items.append(
                TextBlock(
                    f"👤 {tb['user_name']}\n📝 {tb['purpose']}",
                    size="Small",
                    isSubtle=True,
                    wrap=True
                )
            )

        containers.append(container)

    card = AdaptiveCard(
        body=[
            TextBlock("📊 Testbed Status", size="Large", weight="Bolder"),
            *containers
        ],
        actions=[
            Submit(title="🔄 Refresh", data={"action": "refresh_status"})
        ]
    )
    return card.to_dict()
Broadcasting System
📡📢 Multi-Room Broadcasting
The bot can send notifications to multiple Webex rooms simultaneously. Perfect for:
- Team coordination - Notify all stakeholders
- Resource alerts - Broadcast availability changes
- Scheduled maintenance - Inform users of downtime
- Usage reports - Share testbed statistics
Broadcast Configuration (broadcast_rooms.json):
{
  "broadcast_rooms": [
    {
      "name": "QA Team",
      "room_id": "Y2lzY29zcGFyazovL...",
      "description": "Quality assurance team"
    },
    {
      "name": "DevOps Team",
      "room_id": "Y2lzY29zcGFyazovL...",
      "description": "Infrastructure team"
    }
  ]
}
🚢 Deployment Options
- 💻 Local Development
- 🐧 Linux Server
- 🐳 Docker
- ☁️ Cloud Platforms
For Testing and Development:
# Start bot in foreground
python example.py

# Output:
🚀 Starting Testbed Monitor Bot...
📝 Bot Name: Testbed Monitor Bot
🔧 Approved Rooms: 1
✅ Bot is running! Press Ctrl+C to stop.
⚡ WebSocket connected to Webex Cloud
💡Development Tips
Best practices for local development:
- Use
.env.localfor local-specific configuration - Enable debug logging:
logging.basicConfig(level=logging.DEBUG) - Test in private Webex room first
- Use
ngrokif you need to test webhooks - Monitor
testbed_monitor.jsonchanges in real-time
Production Deployment on Linux:
Create systemd service:
# Create service file
sudo nano /etc/systemd/system/testbed-bot.service
[Unit]
Description=Testbed Monitor Webex Bot
After=network.target

[Service]
Type=simple
User=botuser
WorkingDirectory=/opt/webexchatbot_sample
Environment="PATH=/opt/webexchatbot_sample/.venv/bin"
EnvironmentFile=/opt/webexchatbot_sample/.env
ExecStart=/opt/webexchatbot_sample/.venv/bin/python example.py
Restart=on-failure
RestartSec=10

[Install]
WantedBy=multi-user.target
Enable and start:
# Enable service
sudo systemctl enable testbed-bot

# Start service
sudo systemctl start testbed-bot

# Check status
sudo systemctl status testbed-bot

# View logs
sudo journalctl -u testbed-bot -f
Containerized Deployment:
FROM python:3.11-slim

# Set working directory
WORKDIR /app

# Install dependencies
COPY requirements.txt .
RUN pip install --no-cache-dir -r requirements.txt

# Copy application
COPY . .

# Create data directory
RUN mkdir -p /app/data

# Run bot
CMD ["python", "example.py"]
Docker Compose:
version: '3.8'

services:
testbed-bot:
  build: .
  container_name: testbed_monitor_bot
  restart: unless-stopped
  env_file:
    - .env
  volumes:
    - ./testbed_monitor.json:/app/testbed_monitor.json
    - ./broadcast_rooms.json:/app/broadcast_rooms.json
  networks:
    - bot_network

networks:
bot_network:
  driver: bridge
Deploy:
# Build and start
docker-compose up -d

# View logs
docker-compose logs -f

# Stop
docker-compose down
Cloud Deployment Options:
1. AWS EC2:
# Launch EC2 instance (Amazon Linux 2)
aws ec2 run-instances \
  --image-id ami-0c55b159cbfafe1f0 \
  --instance-type t3.micro \
  --key-name your-key \
  --security-groups bot-sg

# SSH and setup
ssh -i your-key.pem ec2-user@instance-ip
git clone https://github.com/ngtanthanh-qc/webexchatbot_sample.git
cd webexchatbot_sample
python3 -m venv .venv
source .venv/bin/activate
pip install -r requirements.txt

# Use systemd or screen for background execution
screen -S bot
python example.py
# Press Ctrl+A then D to detach
2. Heroku:
# Create Procfile
echo "worker: python example.py" > Procfile

# Deploy
heroku create testbed-monitor-bot
heroku config:set WEBEX_ACCESS_TOKEN=your_token
git push heroku main
heroku ps:scale worker=1
3. Google Cloud Run:
# Build container
gcloud builds submit --tag gcr.io/PROJECT-ID/testbed-bot

# Deploy
gcloud run deploy testbed-bot \
  --image gcr.io/PROJECT-ID/testbed-bot \
  --platform managed \
  --region us-central1 \
  --set-env-vars WEBEX_ACCESS_TOKEN=your_token
4. Azure Container Instances:
# Create resource group
az group create --name testbed-bot-rg --location eastus

# Deploy container
az container create \
  --resource-group testbed-bot-rg \
  --name testbed-bot \
  --image your-registry/testbed-bot:latest \
  --environment-variables WEBEX_ACCESS_TOKEN=your_token \
  --restart-policy Always
🔧 Advanced Configuration
Proxy Support
🔒🌐 Corporate Proxy Configuration
Many corporate environments require proxy configuration:
HTTP/HTTPS Proxy:
proxies = {
    'https': 'http://proxy.company.com:80'
}
SOCKS5 Proxy (for WebSocket):
proxies = {
    'wss': 'socks5://proxy.company.com:1080'
}
Authenticated Proxy:
proxies = {
    'https': 'http://username:password@proxy.company.com:80'
}
In config.py:
@classmethod
def get_proxies(cls):
    proxies = {}
    if cls.HTTPS_PROXY:
        proxies['https'] = cls.HTTPS_PROXY
    if cls.WSS_PROXY:
        proxies['wss'] = cls.WSS_PROXY
    return proxies if proxies else None
Custom Logging
import logging
from colorlog import ColoredFormatter

# Create colored formatter
formatter = ColoredFormatter(
  "%(log_color)s%(asctime)s - %(name)s - %(levelname)s - %(message)s",
  datefmt='%Y-%m-%d %H:%M:%S',
  log_colors={
      'DEBUG': 'cyan',
      'INFO': 'green',
      'WARNING': 'yellow',
      'ERROR': 'red',
      'CRITICAL': 'red,bg_white',
  }
)

# Configure handlers
console_handler = logging.StreamHandler()
console_handler.setFormatter(formatter)

file_handler = logging.FileHandler('testbed_bot.log')
file_handler.setFormatter(logging.Formatter(
  '%(asctime)s - %(name)s - %(levelname)s - %(message)s'
))

# Configure root logger
logging.basicConfig(
  level=logging.INFO,
  handlers=[console_handler, file_handler]
)

# Bot-specific logger
logger = logging.getLogger('testbed_bot')
logger.setLevel(logging.DEBUG)
Database Migration
- 📄 JSON (Current)
- 🗄️ SQLite
- 🐘 PostgreSQL
Current Implementation - Simple and Portable:
✅ Advantages:
- No external dependencies
- Easy to read/edit manually
- Simple backup (just copy file)
- Works everywhere
❌ Limitations:
- Not suitable for high concurrency
- Limited query capabilities
- No built-in transactions
Upgrade to SQLite:
import sqlite3
from datetime import datetime

class TestbedDatabase:
    def __init__(self, db_file="testbed_monitor.db"):
        self.conn = sqlite3.connect(db_file, check_same_thread=False)
        self.conn.row_factory = sqlite3.Row
        self.init_database()

    def init_database(self):
        cursor = self.conn.cursor()
        cursor.execute('''
            CREATE TABLE IF NOT EXISTS testbeds (
                id INTEGER PRIMARY KEY,
                testbed_name TEXT NOT NULL,
                status TEXT DEFAULT 'available',
                user_email TEXT,
                user_name TEXT,
                registered_time TEXT,
                purpose TEXT,
                expected_release_time TEXT
            )
        ''')

        cursor.execute('''
            CREATE INDEX IF NOT EXISTS idx_status
            ON testbeds(status)
        ''')

        self.conn.commit()

    def get_available_testbeds(self):
        cursor = self.conn.cursor()
        cursor.execute(
            "SELECT * FROM testbeds WHERE status = 'available'"
        )
        return [dict(row) for row in cursor.fetchall()]

    def register_testbed(self, testbed_id, user_email, user_name,
                        purpose, release_time):
        cursor = self.conn.cursor()
        cursor.execute('''
            UPDATE testbeds
            SET status = 'in_use',
                user_email = ?,
                user_name = ?,
                registered_time = ?,
                purpose = ?,
                expected_release_time = ?
            WHERE id = ?
        ''', (user_email, user_name, datetime.utcnow().isoformat(),
              purpose, release_time, testbed_id))

        self.conn.commit()
        return cursor.rowcount > 0
Production-Grade PostgreSQL:
import psycopg2
from psycopg2.extras import RealDictCursor
from contextlib import contextmanager

class TestbedDatabase:
    def __init__(self, connection_string):
        self.conn_string = connection_string
        self.init_database()

    @contextmanager
    def get_cursor(self):
        conn = psycopg2.connect(self.conn_string)
        cursor = conn.cursor(cursor_factory=RealDictCursor)
        try:
            yield cursor
            conn.commit()
        except Exception:
            conn.rollback()
            raise
        finally:
            cursor.close()
            conn.close()

    def init_database(self):
        with self.get_cursor() as cursor:
            cursor.execute('''
                CREATE TABLE IF NOT EXISTS testbeds (
                    id SERIAL PRIMARY KEY,
                    testbed_name VARCHAR(100) NOT NULL,
                    status VARCHAR(20) DEFAULT 'available',
                    user_email VARCHAR(255),
                    user_name VARCHAR(255),
                    registered_time TIMESTAMP,
                    purpose TEXT,
                    expected_release_time TIMESTAMP,
                    created_at TIMESTAMP DEFAULT NOW(),
                    updated_at TIMESTAMP DEFAULT NOW()
                )
            ''')

            cursor.execute('''
                CREATE INDEX IF NOT EXISTS idx_testbed_status
                ON testbeds(status)
            ''')

            cursor.execute('''
                CREATE INDEX IF NOT EXISTS idx_user_email
                ON testbeds(user_email)
            ''')

    def get_testbed_history(self, testbed_id, limit=10):
        with self.get_cursor() as cursor:
            cursor.execute('''
                SELECT user_name, registered_time,
                       expected_release_time, purpose
                FROM testbed_history
                WHERE testbed_id = %s
                ORDER BY registered_time DESC
                LIMIT %s
            ''', (testbed_id, limit))
            return cursor.fetchall()
Connection String:
# .env file
DATABASE_URL=postgresql://user:password@localhost:5432/testbed_db
🐛 Troubleshooting
🔧Common Issues & Solutions
Bot Not Responding
Symptoms:
- Bot appears online but doesn't reply
- Commands are ignored
- No error messages
Solutions:
🔍 Issue Troubleshooter
Debug Mode
Enable detailed logging for troubleshooting:
import logging
import os
from webex_bot.webex_bot import WebexBot

# Enable DEBUG logging for all components
logging.basicConfig(
  level=logging.DEBUG,
  format='%(asctime)s - %(name)s - %(levelname)s - %(message)s'
)

# Enable webex_bot specific debug logs
logging.getLogger('webex_bot').setLevel(logging.DEBUG)
logging.getLogger('webexpythonsdk').setLevel(logging.DEBUG)
logging.getLogger('websockets').setLevel(logging.DEBUG)

# Start bot with debug info
bot = WebexBot(
  teams_bot_token=os.getenv("WEBEX_ACCESS_TOKEN"),
  bot_name="Testbed Monitor (DEBUG)",
  include_demo_commands=True  # Include demo commands for testing
)

bot.run()
Health Check Endpoint
Add health monitoring:
from datetime import datetime
import threading
from http.server import HTTPServer, BaseHTTPRequestHandler
import json

class HealthCheckHandler(BaseHTTPRequestHandler):
  bot_status = {
      'started_at': datetime.utcnow().isoformat(),
      'last_message': None,
      'websocket_connected': False,
      'messages_processed': 0
  }

  def do_GET(self):
      if self.path == '/health':
          self.send_response(200)
          self.send_header('Content-Type', 'application/json')
          self.end_headers()

          status = {
              'status': 'healthy' if self.bot_status['websocket_connected'] else 'unhealthy',
              'uptime': (datetime.utcnow() - datetime.fromisoformat(
                  self.bot_status['started_at']
              )).total_seconds(),
              **self.bot_status
          }

          self.wfile.write(json.dumps(status, indent=2).encode())
      else:
          self.send_response(404)
          self.end_headers()

  def log_message(self, format, *args):
      pass  # Suppress HTTP logs

def start_health_server(port=8080):
  server = HTTPServer(('0.0.0.0', port), HealthCheckHandler)
  thread = threading.Thread(target=server.serve_forever, daemon=True)
  thread.start()
  print(f"✅ Health check server started on port {port}")
  return server

# In your main bot script:
# health_server = start_health_server(8080)
# bot.run()
Test health endpoint:
curl http://localhost:8080/health
📊 Monitoring & Analytics
Usage Statistics
Track bot usage with metrics:
📈 Bot Analytics Dashboard
🎓 Best Practices
🔒Security
Never commit sensitive data:
- Use
.envfiles - Add
.envto.gitignore - Use secret management tools
- Rotate tokens regularly
- Implement rate limiting
🛡️Error Handling
Robust error handling:
- Try-except blocks everywhere
- Log all errors with context
- Graceful degradation
- User-friendly error messages
- Automatic retry logic
⚡Performance
Optimize for speed:
- Cache frequently used data
- Async operations where possible
- Database indexing
- Minimize card complexity
- Connection pooling
📊Monitoring
Track everything:
- Command usage metrics
- Response times
- Error rates
- User engagement
- Resource utilization
🚀 Next Steps & Enhancements
- 🎯 Feature Ideas
- 🔌 Integrations
- 📈 Scaling
Potential Enhancements:
-
📅 Calendar Integration
- Sync with Google Calendar/Outlook
- Automated scheduling
- Conflict detection
- Reminder notifications
-
📧 Email Notifications
- Release reminders
- Overdue alerts
- Weekly summary reports
- Team digests
-
🤖 AI/ML Features
- Usage pattern analysis
- Predictive availability
- Smart recommendations
- Anomaly detection
-
📱 Mobile Optimization
- Responsive card designs
- Push notifications
- Mobile-first UI
- Gesture support
-
🔗 CI/CD Integration
- Jenkins/GitHub Actions hooks
- Automated testbed allocation
- Pipeline status updates
- Test result reporting
Third-Party Integrations:
JIRA Integration:
from jira import JIRA

def create_testbed_ticket(testbed_name, user_email, purpose):
    jira = JIRA('https://company.atlassian.net',
                basic_auth=('user', 'token'))

    issue = jira.create_issue(
        project='TESTBED',
        summary=f'Testbed {testbed_name} in use',
        description=f'''
            User: {user_email}
            Purpose: {purpose}
            Status: In Use
        ''',
        issuetype={'name': 'Task'}
    )
    return issue.key
Slack Integration:
from slack_sdk import WebClient

def notify_slack(testbed_info):
    client = WebClient(token=os.getenv('SLACK_BOT_TOKEN'))

    client.chat_postMessage(
        channel='#testbed-alerts',
        text=f"🔴 {testbed_info['testbed_name']} now in use by {testbed_info['user_name']}"
    )
PagerDuty Alerts:
import pypd

def create_pagerduty_alert(testbed_name):
    pypd.api_key = os.getenv('PAGERDUTY_API_KEY')

    incident = pypd.Incident.create(
        title=f'Testbed {testbed_name} stuck',
        service=pypd.Service.find_one(name='Testbed Service'),
        urgency='high'
    )
Scaling Strategies:
Horizontal Scaling:
# Kubernetes deployment
apiVersion: apps/v1
kind: Deployment
metadata:
  name: testbed-bot
spec:
  replicas: 3  # Multiple bot instances
  selector:
    matchLabels:
      app: testbed-bot
  template:
    metadata:
      labels:
        app: testbed-bot
    spec:
      containers:
      - name: bot
        image: testbed-bot:latest
        env:
        - name: WEBEX_ACCESS_TOKEN
          valueFrom:
            secretKeyRef:
              name: bot-secrets
              key: token
Load Balancing:
- Use Redis for session management
- Shared database for state
- Message queue (RabbitMQ/Kafka)
- Distributed caching
High Availability:
- Multi-region deployment
- Database replication
- Health checks & auto-restart
- Rolling updates
📚 Resources & References
🔗 Official Documentation
- Webex Developer Portal - Create bots and get tokens
- Webex Python SDK - Official Python library
- Adaptive Cards Designer - Design and test cards
- webex_bot Framework - Bot framework documentation
📖 Learning Resources
- Webex Bot Tutorial Series - Official tutorials
- Python Async Programming - For advanced features
- WebSocket Protocol - Understanding WebSockets
- JSON Database Design - Data structure best practices
🛠️ Tools & Utilities
- Postman Collection - Test Webex APIs
- ngrok - Temporary public URLs for local testing
- Docker Hub - Container images
- GitHub Actions - CI/CD automation
🎉 Conclusion
You're Ready to Build!
You now have everything needed to create a production-ready Webex chatbot for testbed monitoring. Start small, iterate quickly, and scale as needed.
Key Takeaways
WebSocket Magic
No webhooks, no public IP, works behind firewalls
Rich UI
Adaptive Cards provide interactive, beautiful interfaces
Real-time
Instant updates and bidirectional communication
Scalable
Start simple, scale to enterprise-grade deployments
Secure
Built-in authentication and authorization
Extensible
Easy to add new features and integrations
Built with ❤️ using Webex, Python, and WebSockets
Questions? Issues? Visit the GitHub Issues page
Last updated: October 2025 | Version 1.0